Road graph editing#
Editing rules#
The road graph data are not edited directly in the production schema road_graph,
but in a dedicated editing session schema road_graph_editing, which acts as a sandbox.
The editing is made in four steps, described below.
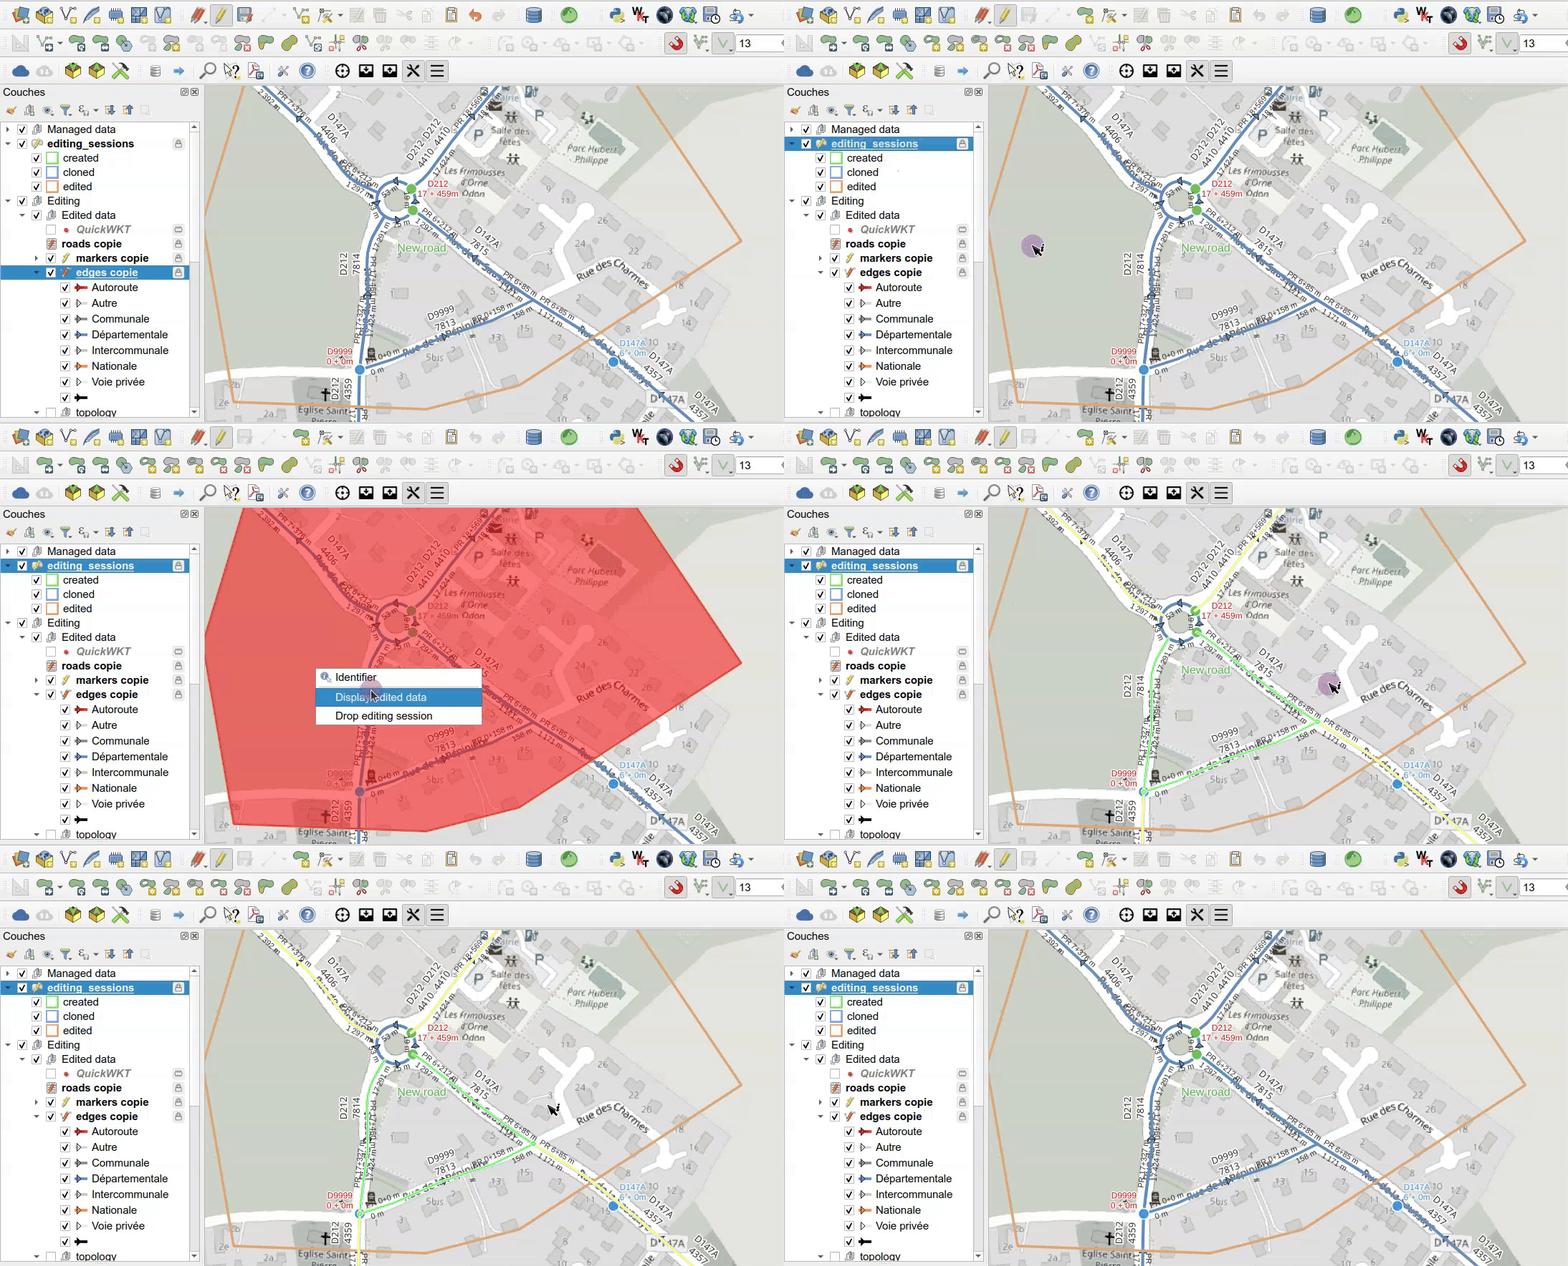
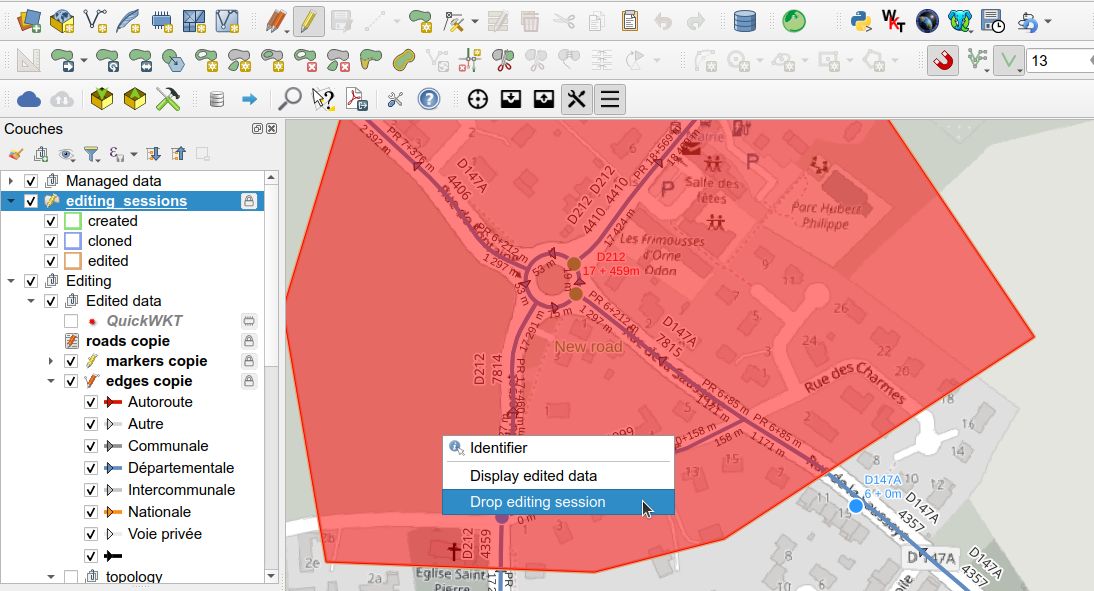
At any time, the modifications of the editing session can be highlighted with the action Display edited data, and the editing session can be cancelled with the action Drop editing session.
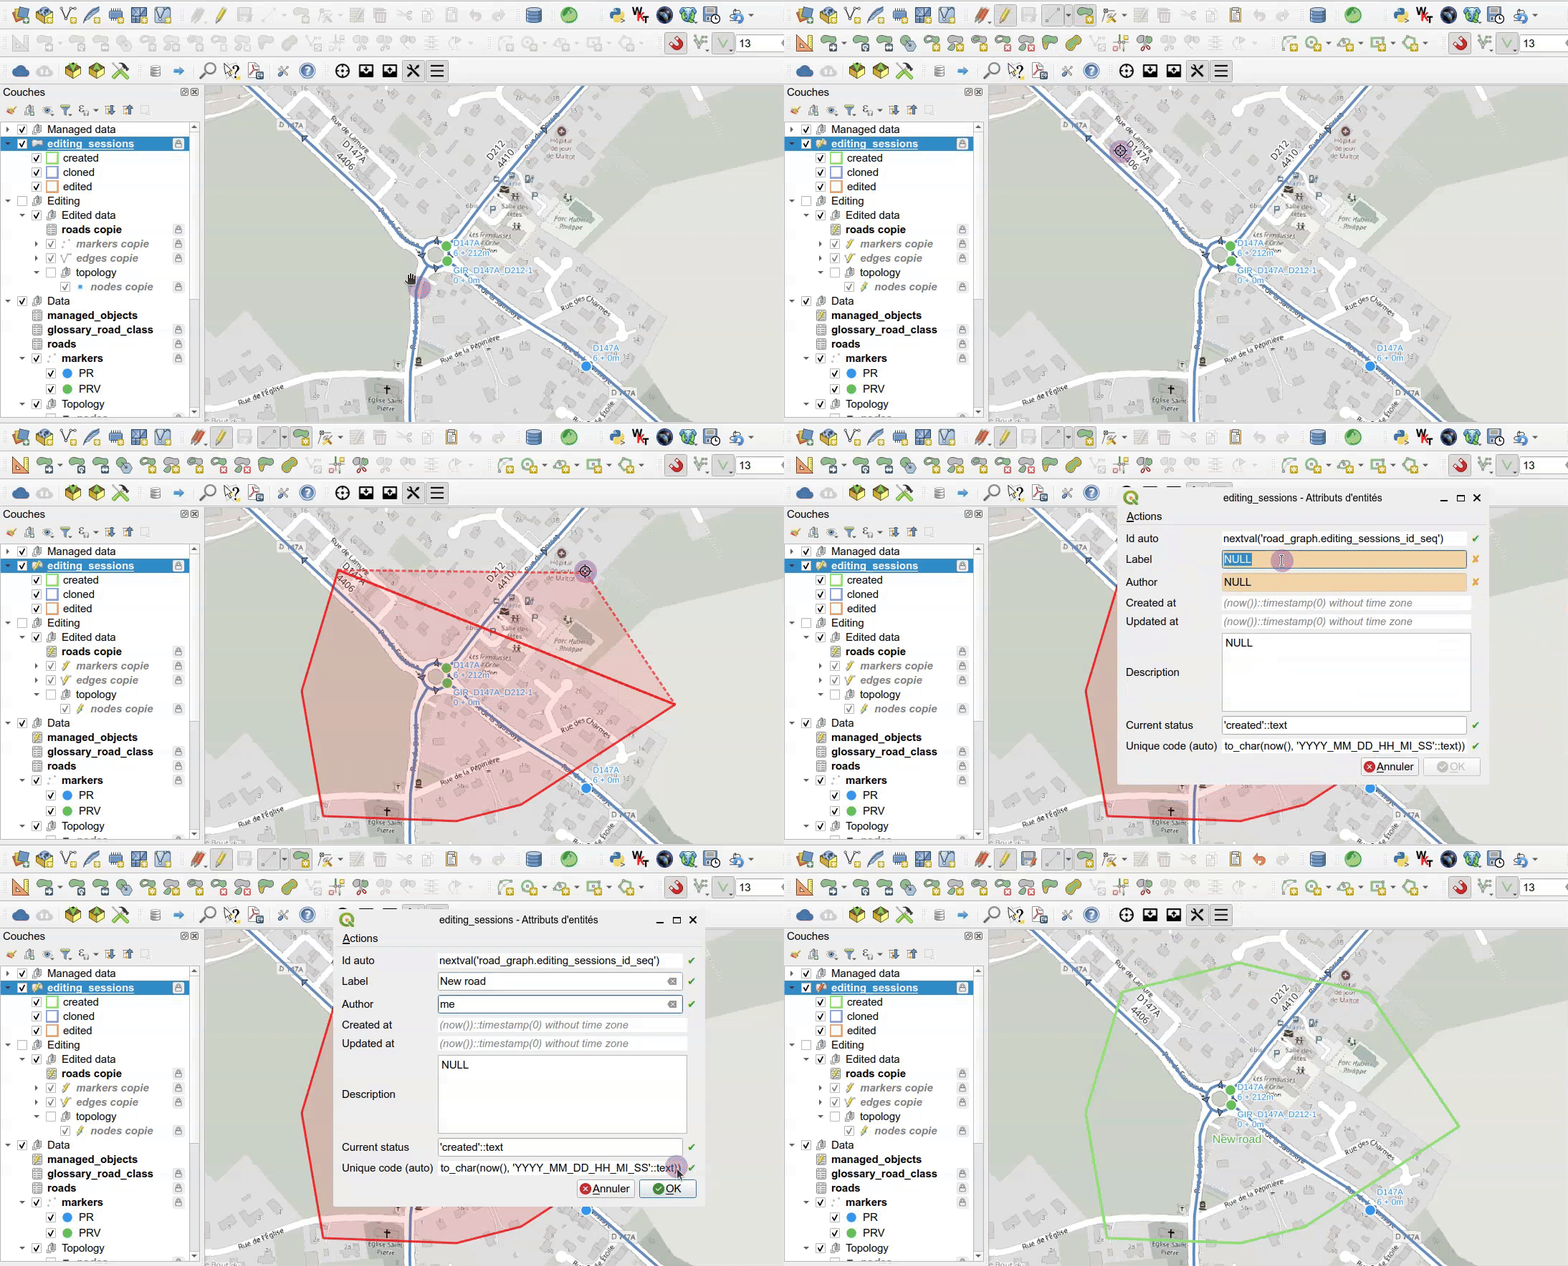
Draw the editing session polygon#
The user draws a polygon in the editing_sessions layer around the area to edit.
The new editing session has the status created.
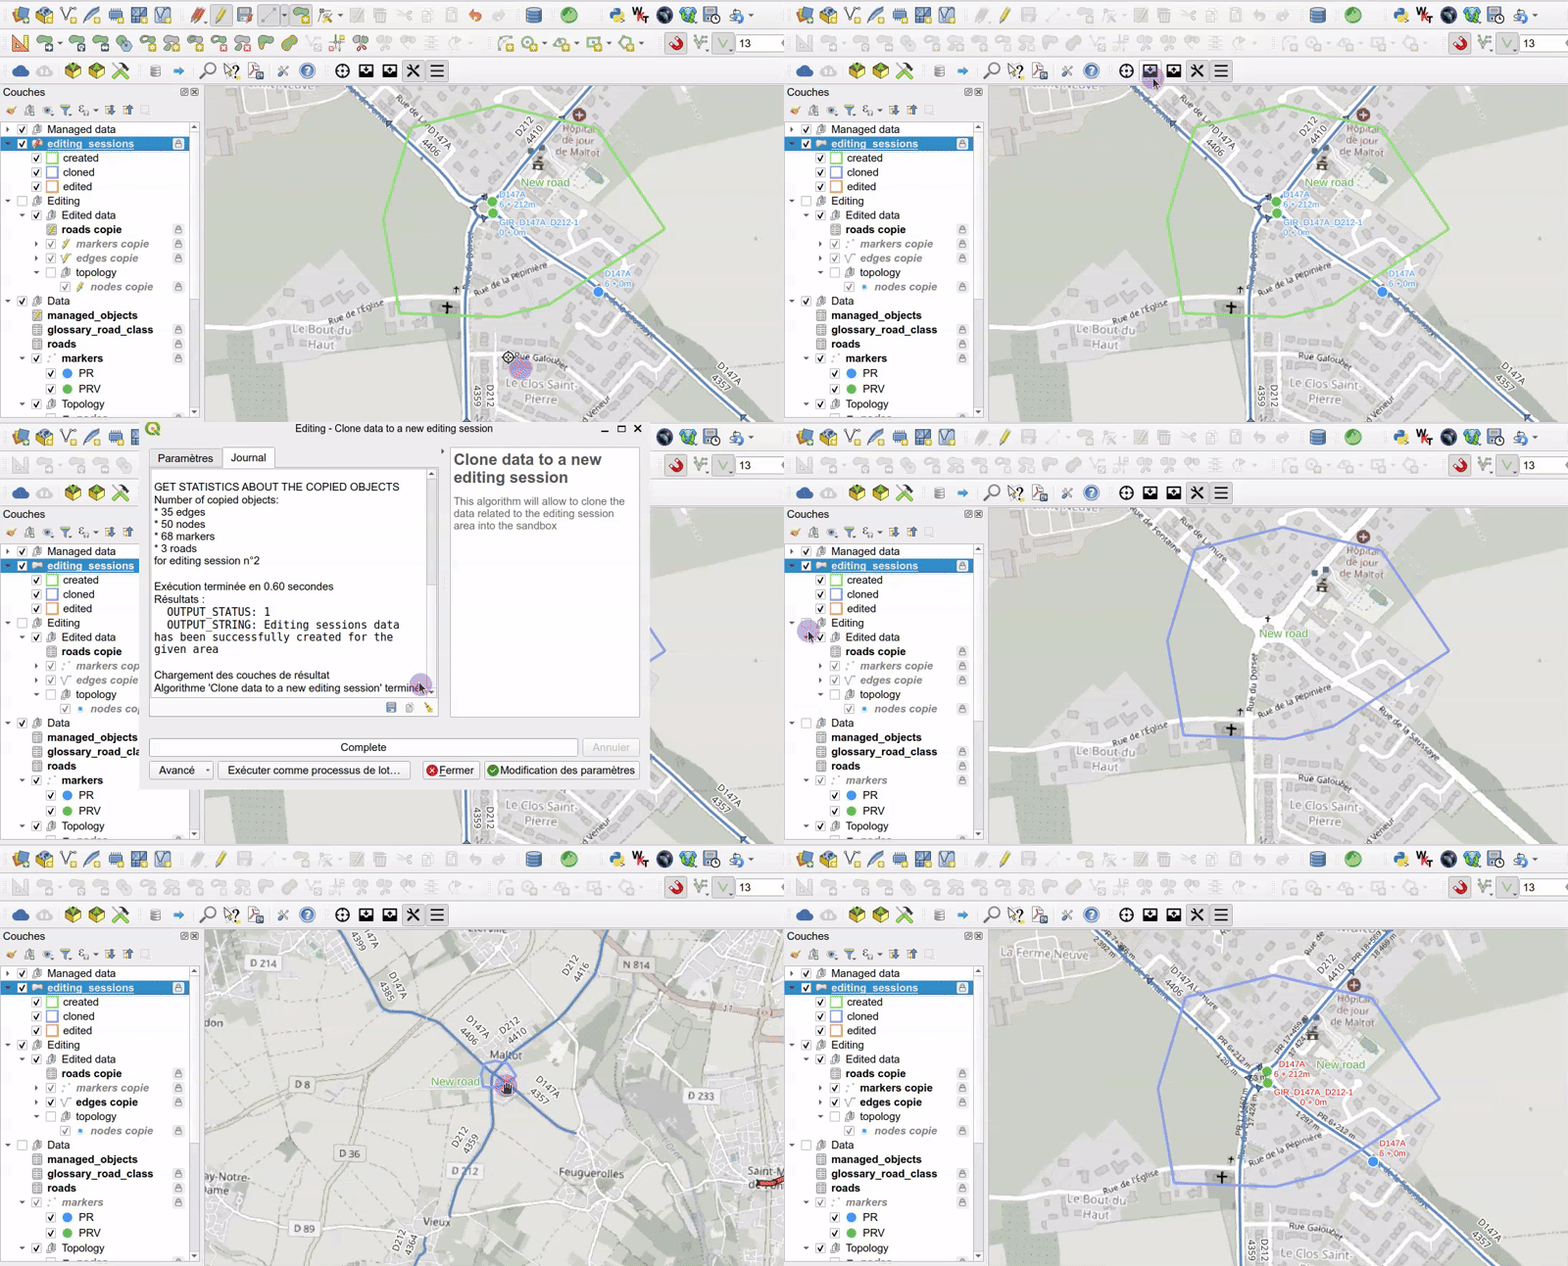
Clone the data into the sandbox#
The algorithm Clone data to a new editing session (toolbar button Clone data to the editing sandbox,
or layer action Create editing session)
copies an extract of the production data inside this polygon into the sandbox.
The status becomes cloned.
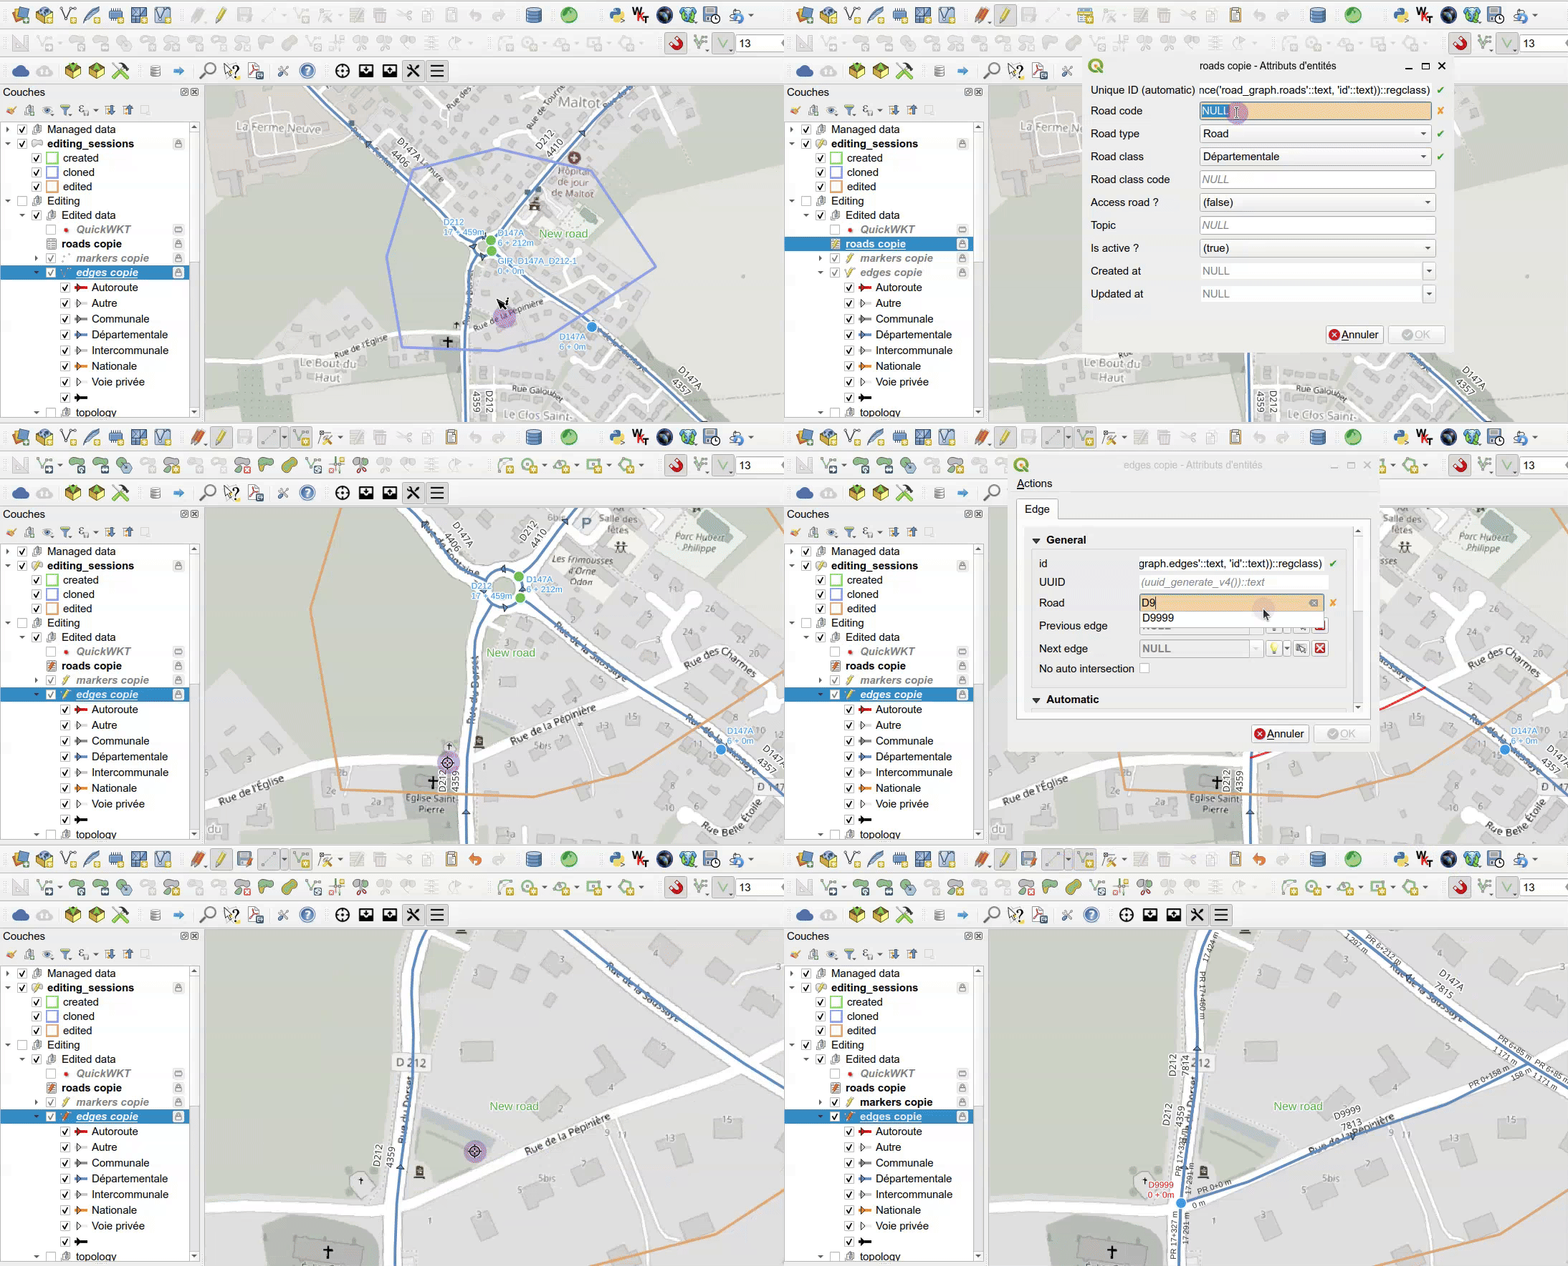
Edit the data#
The editing is made with the QGIS tools: forms, topological editing, etc.
The status becomes edited after the first change.
- QGIS automatic transaction grouping is activated in the project: the changes made by the database triggers (node creation, edge split, etc.) are visible live.
- A layer action helps to create roundabouts, see Create a roundabout.
Merge the editing session#
The algorithm Merge editing session data (toolbar button Merge editing sandbox data)
merges the modifications back into the road_graph schema
and updates the managed objects.
The sandbox data and the merged editing session are then deleted.
Do not edit the production schema directly#
Do not edit the production schema road_graph directly
The layers of the production schema road_graph can technically be edited,
but some automatic processes only work with an editing session:
- the intersections between edges are only cut inside the editing session polygon. Without an editing session, a new edge crossing a road is not connected to it, without any error message, and the road graph becomes wrong,
- the managed objects (business data) are only updated when an editing session is merged: their references or geometries are no longer right after a direct modification of the road graph,
- the modifications are not logged: they cannot be displayed with the action
Display edited data, nor cancelled with the actionDrop editing session, - the modifications are immediately visible by all the users, for example in Lizmap.
Always edit the road graph in an editing session.
Correct the whole road graph after a first import
The editing session polygon can cover all the data, for example a rectangle around the whole road graph, to correct the data after a first import. The performance is the same as with a small editing session: with the demo data (7,809 edges), the data are cloned in about 1 second, and the edits and the merge take the same time. But only one editing session can be edited at a time: the other users must wait for the merge to edit the road graph.
Editing session actions#
The editing_sessions layer has three layer actions.
To run an action on an editing session, use the Identify Features tool and right-click
on the editing session polygon in the map, or use the Run Feature Action tool of the Attributes toolbar.
See also Layer actions.
Create editing session#
This action opens the algorithm Clone data to a new editing session, which copies the production data
inside the last created editing session polygon into the editing schema, like the toolbar button
Clone data to the editing sandbox.
It is a layer action: it is available in the Actions menu of the editing_sessions attribute table toolbar,
and does not need any selected feature.
Display edited data#
This action highlights in the map the objects modified in the editing session,
from the content of its logged_ids column of the layer editing_sessions. The objects flash with a color depending on the modification:
| Color | Modification | Layer used to display the object |
|---|---|---|
| Yellow | Updated | the editing layer, e.g. edges copie |
| Red | Deleted | the production layer, e.g. edges |
| Green | Inserted | the editing layer, e.g. edges copie |
The edges, nodes and markers are displayed. A message is displayed if the editing session does not contain any modification.
Drop editing session#
This action deletes the editing session and all the data of the editing schema road_graph_editing,
with the database function road_graph.drop_editing_session.
The modifications which have not been merged are lost: a confirmation is asked before.
The action is cancelled with a warning if:
- the
editing_sessionslayer is not in editing mode, - the tool
Get references on hoveris activated: uncheck the checkboxGet references on hover ?in theRoad network toolspanel before.
You may have to refresh the map canvas to see the changes.
Info
Do not forget to save the state by clicking on the Save button of QGIS editing toolbar.
Create a roundabout#
Roundabouts have their own road code, e.g. GIR_D40_D80, and cut the other roads
(see Concepts).
The road of the roundabout must exist in the roads layer with the road type roundabout.
To create a roundabout in the editing session:
- Toggle editing on the edges layer.
- Use the QGIS shape digitizing tool
Circle by a center point and another pointto draw the roundabout circle, and give it the road code of the roundabout. - Once the circle is created, the database trigger functions automatically split the circle into edges at each intersection with the edges of the existing crossroads.
- Right-click on one of the edges of the roundabout circle with the
Identify Featurestool, and choose the actionFinalize the roundabout.
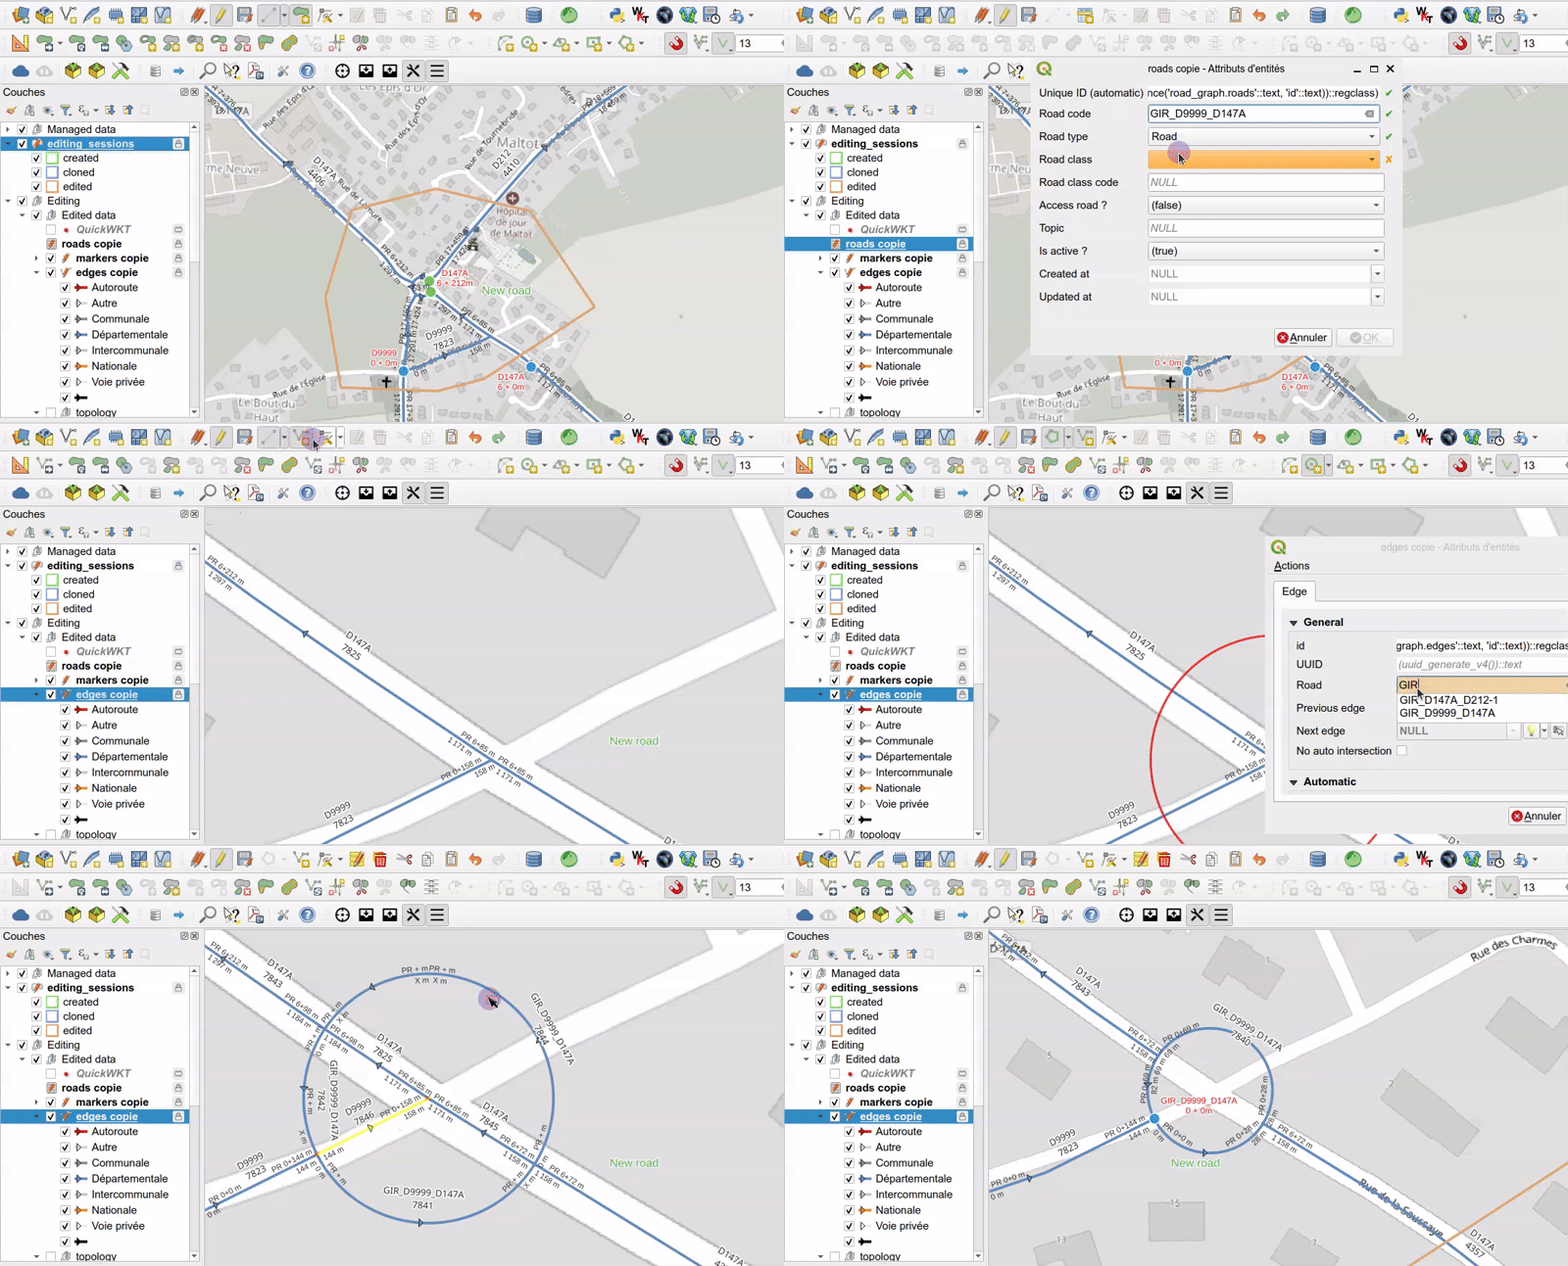
This layer action of the edges copie layer runs the database function clean_digitized_roundabout, which:
- deletes the pieces of edges inside the roundabout, and updates the previous and next edges of the remaining roads,
- deletes the node created by QGIS at the top of the circle, by merging the two edges around it,
- adds a marker
0for this roundabout, on its westernmost node, if it does not already exist.
The action is cancelled with a warning if the layer is not in editing mode,
or if the road type of the selected edge is not roundabout.
You may have to refresh the map canvas to see the changes.
Edges which must not be cut#
By default, the database trigger functions keep the graph topology up to date while you edit:
- when an edge is drawn or its geometry is modified, a node is created at each intersection of this edge with the other edges, and the crossing edges are split by this node. If a node already exists less than 50 cm from the intersection, it is used instead.
- when a node is created or moved on an edge, far enough from its start and end points, this edge is split by the node. This is also the case of the start or end node of an edge being drawn, for example a new road arriving in the middle of another road.
Only the intersections of the drawn or modified edge are processed, and only inside the editing session polygon. The intersections between the other edges are kept as they are: two edges crossing each other without a node, for example at an existing bridge, stay without a node, even when one of them is split by the drawn edge.
But two roads drawn on top of each other are not always connected: a highway crossing a road on a bridge,
a road going through a tunnel, the access roads of a highway interchange, etc.
For these edges, check the field No intersection cutting (no_intersection_cutting) in the edge form.
It can be changed at any time, for example before drawing or modifying a road which crosses a bridge.
An edge with no_intersection_cutting set to True:
- is not split at its intersections with the other edges, and does not split them: no node is created at these intersections, whether the field is set on the drawn edge or on the crossed edge,
- is not split by the existing nodes located under it, for example a crossroad of the roads located under a bridge, even when such a node is moved,
- is split when the start or end point of a drawn or moved edge is located on it, far enough from its own start and end points: for example a new access road arriving in the middle of a highway edge. This makes sense since the two roads are really connected at this point.
The value of the field is kept when an edge is split: the new parts have the same value.
The diagram below shows when an edge is split:
Tip
Before drawing a new road which crosses a highway interchange without being connected to it,
set the field to True for the new edge, or for the crossed highway and access roads edges:
no node will be created at these intersections, and only the roads really connected will be split.
Impacts of the modifications on the references#
The references of each edge, at its start and end points, are calculated automatically by the database trigger functions (see Tables and fields):
- the marker and the abscissa: the last marker before the point, and the distance from this marker,
- the cumulative distance: the distance from the start of the road.
They only depend on what is located before the point, in the direction of the road. A modification of the road graph therefore only impacts the references downstream of it:
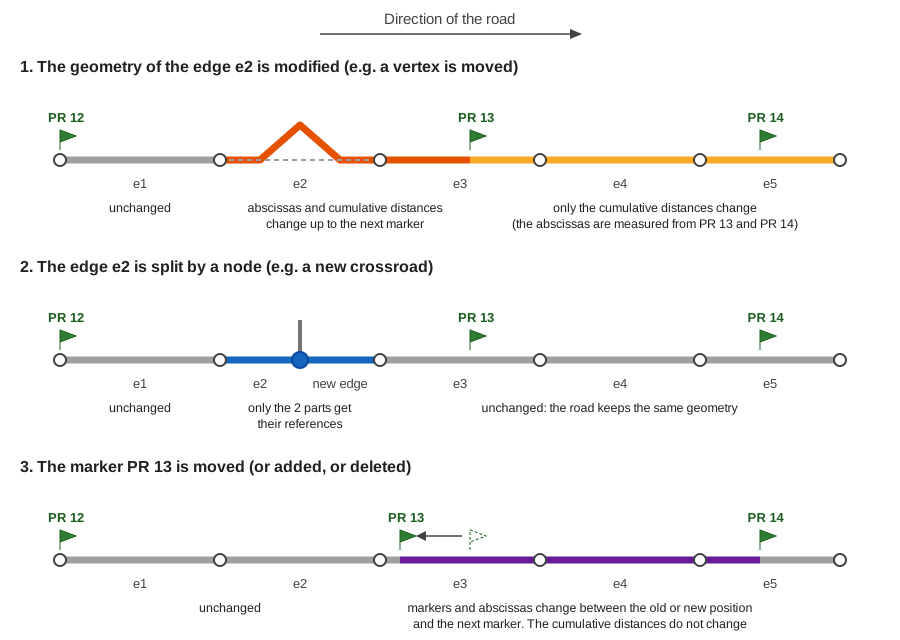
- The geometry of an edge is modified, for example when a vertex is moved: the road becomes longer or shorter.
- the references of the edges upstream of the modified edge do not change,
- the markers and abscissas change from the modified edge up to the next marker, real or virtual. After it, the abscissas are measured from this marker, which has not moved,
- the cumulative distances change for all the edges downstream, up to the end of the road.
- An edge is split by a node, for example at a new crossroad: the geometry of the road does not change. Only the two parts of the split edge get their new references: the references of all the other edges do not change. This is the fastest modification, even on a long road.
- A marker is moved, added or deleted: the markers and abscissas change between the old or new position of the marker and the next marker. The cumulative distances do not change.
When the editing session is merged, the managed objects of the modified roads are updated with the same logic: for example, an object located downstream of a lengthened edge gets a greater cumulative distance, and a greater abscissa if it is located before the next marker. See Example: impacts of a graph modification.
Note
The references of the edges are recalculated for the whole road after a modification of its geometry or of its markers: on a long road, for example a road of 100 km with more than 100 edges, each modification can take a few seconds.
How to edit the data in QGIS#
In QGIS, you can edit the layer data by toggling the editing mode for each layer:
- Select the layer in the panel by clicking on it: the layer is highlighted in blue
- Right-click on the layer name and select
Toggle Editingor use the menuLayer / Toggle Editing
To add a new record, select the layer in the Layers panel,
then use the menu Edit / Add Record (or CTRL+.). It will open a form which lets you enter the needed data.
Once every required fields have been filled, validate with the OK button on the bottom-right.
To view all the records of a layer, select the layer in the Layers panel,
then open the attribute table with the menu Layer / Open Attribute Table (or F6)
You can undo previous modifications with the menu Edit / Undo (or CTRL+Z).
To permanently save the changed data in the layer, you need to use the menu Layer / Save Layer Edits.
After saving the data, you will not be able to undo your changes
(but you can always reopen the data and changed the values).
To edit a record, open the layer attribute table, and then click on the small button Switch to form view
on the bottom-right of the dialog (the first one). Then select a record in the left panel,
and use the displayed form to edit the data.
To delete a record, select the record in the attribute table by clicking on the line number on the left:
the line must be highlighted in blue. Then use the trash icon Delete selected features (or Del).
You can undo the deletion if you have not yet saved layer edits.